Thursday, May 13, 2010

Quinoa with Leeks, Chard, and other fun stuff!

I really, really, really like quinoa. If you've never tried it (this was I until 6 months ago), but you like rice, you'll probably like quinoa, too. It has a nutty taste to it and it kind of feels like the you're biting into little seeds.


You should also love it because it has 8 grams of protein and 5 grams of fiber per cup (cooked). In contrast, white rice has only 3.5 grams of protein and 2 grams of fiber per cup. Quinoa has a nice dose of iron (2.8 mg, which is 15% of your recommended daily dose), too, while white rice only has a tiny bit (.2 mg).

But it's always been a challenge for me to find a recipe that brings out the best flavor in vegetables and results in a juicy dish when I want to cook vegetables and add them to the quinoa for a meal. It's mostly a challenge because I share my food with people who are not vegan/vegetarian and so they are not very lenient with vegetables -- they like their food intense, kind of like meat :)

This recipe, however, is anything but bland. To be honest, it's genius to me -- some of the best and healthiest ingredients combined to perfection - I love it.

Here's what you'll need:

1 cup dry quinoa
leek
1 bunch chard leaves
{2 bell peppers} (*I don't really like bell peppers, so I left this ingredient out, which is why the rest of the quantities are larger than in the original recipe)
1 medium red onion
1/2 cup shredded carrot
2 cups asparagus
{firm tofu, cut into 1/2 inch cubes} (*unless you're dying for extra protein, leave this out - you don't need it. I didn't include it, which is why the rest of the quantities are larger than in the original recipe)


 1 (15 1/4 ounce) can sweet corn (rinse it to reduce sodium)
1/4 cup extra virgin olive oil
1/4 cup white wine vinegar
{1/2 cup sweet Thai sweet chili sauce} (*this usually has high-fructose corn syrup in it, so I left it out and the recipe was delicious even without it)
2 tablespoons minced garlic
2 tablespoons minced ginger
salt and pepper 


Directions (courtesy of recipebazaar.com)
Cut the veggies into desired size and shape :)

Add 2 cups of water to the quinoa in a separate pan. Bring to boil, cover, turn to low heat or remove from heat, and let finish cooking.

In a separate saucepan, saute ginger and garlic until soft, then add onions until translucent. Add peppers and leeks; saute until tender. Add olive oil, white wine vinegar, and thai chili sauce along the way.

On a separate skillet, grill asparagus until slightly tender and grill tofu until slightly brown. You could also bake it in the oven, covered with aluminum foil.

Add the asparagus and tofu to the onions, peppers, and leeks. Add any remaining olive oil, white wine vinegar, and sweet thai chili sauce. Add carrots and chard, cover and let chard wilt. Finally, stir in corn.

Serve it over a bed of quinoa and top it with sprouts for an added bonus :) Enjoy!

Wednesday, May 12, 2010

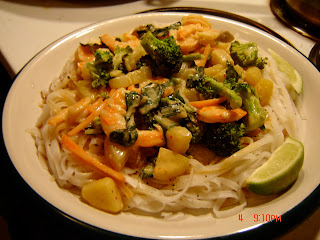
Vegan Thai Red Curry

This recipe is originally based on green curry. But I prefer red curry, so I changed it up a bit. I also left out the tofu and doubled the quantity of vegetables instead (the original recipe had only 1-2 cups of veggies plus 300g tofu). I added some leftover shrimp I still had in the freezer (less than a cup) for a significant source of protein.

My favorite part about it are the flavors! Lemongrass plus galangal, kefir lime leaves, and coconut milk... equals bliss. You'll need:
1 tablespoon peanut oil 
1-2 teaspoons red curry paste
2-3 stalks of lemongrass, bruised
2-3 thin slices of galangal
4 kefir lime leaves 
3-4 cups chopped mixed vegetables (I used broccoli, bok choy, carrot, sweet potatoes, and mushrooms)
1 400 mL can of coconut milk
1 and 1/2 tablespoons light soy sauce
1/2 tablespoon dark soy sauce
1 tablespoon brown sugar
1 lime, quartered
I followed the directions exactly as they are presented here and the recipe turned out amazing. I'd like to also note that it was very much enjoyed even by my meat-loving partner. Here are some pics:
 

You can serve over rice noodles or rice. I did both :)

Wednesday, April 28, 2010

Black & White Chocolate Chip Cookies

For years I've been trying to gather all tips I could find on making the best chocolate chip cookies into my personal take on them... and I think I finally got it. But before I get to that... 

I've also started to learn more about what it takes to become vegan. I would like to become vegan soon, but I'm aware it can't happen overnight. So I'm trying to remove eggs and dairy from my baking as much as possible, while at the same time avoiding soy products. It is tricky!

So the other day I thought, what will I do about chocolate chip cookies if I'm vegan? Well, I haven't quite figured out what I'd do about butter... but I've learned that some chocolate chips are vegan if they are dark chocolate, egg can be replaced with applesauce or bananas, and regular milk can be replaced with coconut milk. 

Okay, okay, now on to the real stuff. 

Here's what you'll need, and please keep in mind that these quantities are my take on the classic recipe:

2 sticks unsalted butter
2 1/4 cups bread flour
1 teaspoon kosher salt
1 teaspoon baking soda (*you can also double this and omit the next ingredient if you like your cookies to puff)

1 teaspoon baking powder (*this isn't regularly included in the recipe, but I like my cookies extra fluffy)
1/4 cup sugar
1 1/4 cups brown sugar
1 egg
1 egg yolk
2 tablespoons milk (*I used coconut milk and the cookies were super tasty!)
1 1/2 Tablespoon vanilla extract (*only about 1 1/2 teaspoons are used usually, but trust me, tripling the amount of vanilla can do wonders!)
1 cup semisweet chocolate chips + 1 cup white chocolate chip cookies (clearly I'll leave these out when I'm vegan) + 1/2 cup chopped Macadamia nuts (*classic recipe has only the regular chocolate chips in it- 2 cups)

Hardware:
Ice cream scooper / Spoon
Parchment paper
Baking sheets
Mixer

Directions:
Heat oven to 375 degrees F.

Melt the butter and brown sugar in a heavy-bottom medium saucepan over low heat. Let the mixture cool almost completely.  Meanwhile, sift together the flour, salt, and baking soda and set aside.

Pour the melted butter in the mixer's work bowl. Add the white sugar sugar and blend together on medium speed. Add the egg, yolk, milk, and vanilla extract and mix until well combined. Slowly incorporate the flour mixture until thoroughly combined. Stir in the chocolate chips and nuts.

Chill the dough, then scoop onto parchment-lined baking sheets, 6 cookies per sheet. Bake for 9-14 minutes or until golden brown, checking the cookies after 5 minutes. Rotate the baking sheet for even browning. Every time you put another batch in the oven, make sure the baking sheet is completely cooled off. When you take the cookies out of the oven, let them sit on the baking sheet for about a minute - they will continue to cook. Then use a spatula to place them on a cooling rack. Cool completely and store in an airtight container.

Tuesday, April 27, 2010

White Bean Soup with Herb Swirl

My favorite thing to eat when it's cold and rainy outside is SOUP. I love homemade soup! If someone cooked me soup for breakfast, lunch and dinner, I could probably live off of it.


(above photo courtesy of Epicurious.com)

This recipe is amazing not only because of the wonderful flavors that combine to make it (fresh carrots, celery, onion, parsley, sage, rosemary, thyme, and tomato puree) but also because it's high in fiber and full of veggies. I modified it from its original version, which is Chicken and White Bean Soup with Herb Swirl by replacing the chicken with an extra can of beans to make it vegetarian.

Another thing that was innovative to me was the unique blend of fresh herbs that are cooked separately and added to the soup only right before you serve it. You might know already that a natural air freshener for your home is to put a tidbit of water in a pan and boil fresh rosemary leaves in it. Well, imagine roasting rosemary plus sage and thyme in a pan even just for a minute... yeah, my house smelled amazing!

Now, you must know that picking through the herbs and breaking them gets boring really fast when all you want is to eat the soup already. So you might want to bring along a friend for this work :) and for sharing the soup later, too!

Also, make sure you buy a bread you absolutely love to go along with this soup, even if it's expensive. This soup makes you feel so spoiled that you'll want to indulge all the way ;)


You'll Need:
8 tablespoons extra-virgin olive oil, divided
2 teaspoons chopped fresh sage
2 teaspoons chopped fresh thyme
1 teaspoon chopped fresh rosemary
1/4 teaspoon salt
1 pound skinless boneless chicken breasts, cut into 1-inch pieces
1 small onion, chopped
2 medium carrots, halved lengthwise, cut crosswise into 1/4-inch pieces
1 large celery stalk, thinly sliced
1/2 cup tomato puree
4 cups low-salt chicken broth
2 15-ounce cans cannellini beans, drained
1/2 cup fresh Italian parsley leaves
1 bay leaf


    Preparation:
    (courtesy of Epicurious.com)
    Heat 4 tablespoons olive oil and next 4 ingredients in small skillet over medium heat until herbs are aromatic, about 11/2 minutes. Pour herb oil into bowl; cool.

    Heat 2 tablespoons oil in large pot over medium heat. Sauté chicken 5 minutes. Using slotted spoon, transfer chicken to bowl. Add 2 tablespoons oil to pot. Add onion, carrots, and celery; sauté until beginning to brown, about 15 minutes. Mix in last 5 ingredients. Bring to boil. Reduce heat; simmer 15 minutes. Add chicken; simmer until cooked through, about 5 minutes. Season with salt and pepper.

    Ladle soup into bowls. Gently swirl 1 teaspoon herb oil into center of each.

    Wednesday, March 31, 2010

    Primavera Risotto Nests with Fried Eggs

    I got this recipe from the Bon Appétit Web site and paired it with their choice of salad, Fennel and Celery with Pumpkin Seeds (pictured here on the left side of the photo) -- it was all better than I could've expected!


    Cooking this was fun because I got to also pick a good wine to go into the risotto and into my glass, while I was making it. Hey, cooks need a break from time to time, too, you know? ;)

    But more importantly, this recipes is great because, if you don't already know, it teaches you when it is usually a good time to add each ingredient to most meals you cook. For example, you sauté the mushrooms at the start of the process, but then you remove them after just 5 minutes and only add them at the end, after everything has finished cooking. This is helpful to know if you wanted to make, say, mushroom pizza: don't settle for canned mushrooms -- instead, buy fresh ones because it only takes 5 minutes to sauté them before adding them to the pizza! Also, garlic and onions usually go in first because (I think) their flavors keep transforming the more you cook them, and hard veggies like carrots and asparagus take a long time to cook thoroughly. 


    So, you see, just by cooking this ONE recipe you can learn so much about flavor blending and cooking times in general. I love it. It was also great as leftovers! 


    Well, since I talked so much here, I will link the recipe, instead of pasting it in here. After all, it is from Bon Appétit and all their recipes turn out exactly as they say they will. 

    I hope you'll enjoy Primavera risotto Nests with Fried Eggs and Fennel and Celery Salad with Pumpkin Seeds.  It was my first time trying Fennel - hey, who knew it tastes like... Absinthe?? :P

    Lentil Hazelnut Burgers (vegetarian)

    You know how some things that taste great don't always look great? Yeah, these burger patties fall right into that category.  Hence, my owl mug is strategically placed in the foreground to distract from the poor look of the patties in the background. Boo! :)
    Looks aside, these patties were DE-LISH! Believe it or not, they actually have a meaty taste. They weren't, however, easy to make, as they do have a tendency to crumble (which annoyed the living crap out of me). I have some suggestions to make your life easier if you attempt to make these. Here's the original recipe with the changes I made in parenthesis:

    Ingredients:

    • 3 cups dry lentils
    • 1 medium onion, chopped
    • 1 cup bread crumbs
    • 1 Tablespoon chopped fresh parsley (I doubled this, but you can add even more. The more parsley, the more flavorful)
    • 3 eggs (I'd suggest 5... otherwise, they will crumble in the pan)
    • 1 cup finely chopped roasted hazelnuts or walnuts
    • 1/2 teaspoon dried thyme, crushed
    • 1 teaspoon dried basil, crushed
    • 1-1/2 teaspoon salt
    • Pepper to taste
    • 1 to 2 Tablespoons vegetable oil (Are you kidding me?? I won't even go into how much oil these soaked up... but, basically, keep adding as much as needed to get them to cook thoroughly and hold together. Use Extra Virgin Olive Oil if you must, but remember not to be too hard on yourself... you are, after all, eating a vegetable high-fiber, high-protein, meatless dinner.)

    Preparation:

    Cook lentils according to package directions; drain and cool (This took about 45 minutes. Drain to the best of your ability, but I'd say not to worry about excess liquid - the bread crumbles will soak that up.)

    Combine lentils, onion, bread crumbs, parsley, eggs, and 
    hazelnuts or walnuts. Stir in thymebasil, salt, and pepper. Mold into burger-sized patties. (The smaller you make them, the lower the risk of them crumbling. The first batch I put consisted of burger-sized patties and they all fell apart. After that, I made them small and flat and got rid of the problem. **COOL TIP: dip your hands in water before each time you make a new patty - this way, they won't stick to your hands **)

    In a large frying pan over medium-high heat, heat vegetable oil. Add four patties at a time and brown. For best results, wipe out frying pan and add new oil for each new batch. Remove from heat and drain on paper towels. Transfer onto a serving platter to serve.

    (Recipe Source: 
    What's Cooking America by Linda Stradley and Andra Cook (Falcon Pub)
    Reprinted with permission.) Here's the link to the original blog post
    Overall, they were worth the trouble. I consider these to be a super food. One cup of lentils has 18 grams of protein and 16 grams of fiber. Whoazaa! In comparison, a meat burger patty only has about 13 grams of protein and a handful of saturated fats. Moreover, hazelnuts... a super food themselves: with about 17 grams of protein, 11 grams of fiber, and a whole bunch of omega fatty acids and Vitamin E per every 100 grams or so of hazelnuts, these guys are one of the best foods for heart health. 
    Lentils and hazelnuts - I have yet to find a tastier, healthier or more nutritious combination when it comes to getting plenty of fiber, protein and vitamins. 

    (Hazelnut photo courtesy of Bon Appétit Magazine Online)

    Monday, March 29, 2010

    The Dirty Dozen, The Clean 15

    This title you have read, I'm sure, many times over the last few years, as the Food & Drug Administration and environmental groupies or health fanatics have scrabbled to put together some guides to help consumer make educated choices when it comes to the produce they eat.

    And, if you're like me, you struggle a lot with the concept of "organic" vs. "conventional" (and whoever determined that "conventional" should be the opposite of "organic," as if it is out of the ordinary to eat fruits and veggies the way they were meant to be, without pesticides and other substances harmful to people and the environment.. *phew* this is a really long parenthesis!)

    So at the end of the day, when it's just you and those piles of brightly-colored, mouth-watering strawberries and, say, grapes, cherries, avocados, tomatoes and cucumbers,... and the only thing standing between you and them is your shopping cart, what do you choose to put in it? Do you always reach for the organic? Organic produce is often 100% more expensive than regular produce.  If you can't always afford organic, where do you compromise? But, most importantly, does organic matter or make a difference?


    Last week I got in the mail a pamphlet that somewhat answered some of these questions. Turns out, organic does matter, although not always. I do not claim to know or understand these things very well, as I am still struggling myself with all the terms used (organic, natural, conventional, etc.) and what they really mean. For example, "natural" is not a term verified by the FDA; it is used loosely and does not mean organic. And yet, it certainly sounds more appealing than "conventional," doesn't it? :)

    But the reason I am posting this is because reading it has changed the way I eat and think about food (well, that and the movie Food, Inc.) and I'm hoping that by sharing it, I can at least provoke some thought in others as well.

    Please read more on this topic from sources that seem reliable to you - or read all sources you can find and decide what you think is the truth.  Information about the "Dirty Dozen, Clean 15" is available on many Web sites - all you have to do is google it. Read about the methodology of research and who conducted the research. Read about what farmers have to say. Learn as much as you can and care about what you put in your body. At the end of the day, you are your best doctor and the best way to stay healthy is to prevent disease in the first place. And believe that, even when you make little choices such as picking between organic or conventional strawberries, you are still playing a huge part in how our economy is shaped. Believe that you can change what becomes affordable and what doesn't by choosing what is right to eat and not necessarily what is cheap.

    All this wisdom talk has made me really hungry! I'm off to make some vegetarian Lentil Hazelnut Burgers! :)

    (List courtesy of the Environmental Working Group; broccoli mugshot :P courtesy of Oregon Live.com)

    Thursday, March 25, 2010

    Grandma's Chocolate Pie

    In the spring, I always crave more fruits and veggies than usual, and so my cooking right around this time relies heavily on these two categories of ingredients. But we'll save those recipes for some other time... because some days call for CHOCOLATE recipes only ;)

    I stumbled upon this recipe a year ago around this time, actually, while I was having a couple of girlfriends over for some lounging in the sun on my back porch. I had a strong craving for chocolate AND pie crust... and what better way to satisfy that than with Chocolate Pie? I've never settled for store-bought "pie filling," but I'm also not experienced enough to make my own, homemade pie crust... and this recipes combines the best of both worlds. What's even better, the chocolate filling has NO corn starch or shortening in it, and I don't know about you, but that's always a plus in my book.

    Oh, and, hey, I bought a CHOCOLATE GRATER just for this occasion. :) I felt so fancy. Now I use it all the time!

    The recipe comes from a very talented person's blog. Not only does she have great taste when it comes to food, she also takes amazing photos. I omitted the meringue because I'm not a fan... so in case you are wondering, it's tasty without it as well.

    Here is "Grandma's Chocolate Pie," word-per-word courtesy of Homesick Texan Blog:

    Filling ingredients:
    4 tablespoons of cocoa or 1 1/2 squares of baking chocolate
    3/4 cups of sugar
    5 tablespoons of flour
    1/4 teaspoon of salt
    1 1/2 cups of milk
    1/2 teaspoon of vanilla
    2 egg yolks, beaten slightly
    1 tablespoon of butter

    Meringue ingredients:
    2 egg whites
    1/8 teaspoon of salt
    4 tablespoons of sugar

    Your favorite pie crust

    Method:
    Mix your sugar, flour, salt, cocoa, eggs and milk (all except vanilla and butter) with a whisk.
    Cook while stirring on medium until it bubbles and thickens, about five to 10 minutes. If it becomes lumpy, just beat out the lumps.
    Remove from heat and stir in your vanilla and butter.
    Meanwhile, poke holes in your pie crust with a fork and bake it at 350 until it’s brown, about 20 minutes.
    Beat your egg whites with salt and when they start to get fluffy add the sugar.
    Pour the chocolate custard into the baked pie shell and top with the beaten egg whites.
    Add 2 T of sugar for every egg white. Bake it until it the peaks on the meringue are lightly browned, about 10 minutes.

    Grandma’s says: “It’s real good hot, wonderful cold and you can even eat it frozen—then it’s like a popsicle!”


    These photos are my own. For the author's original photos, visit her blog.